
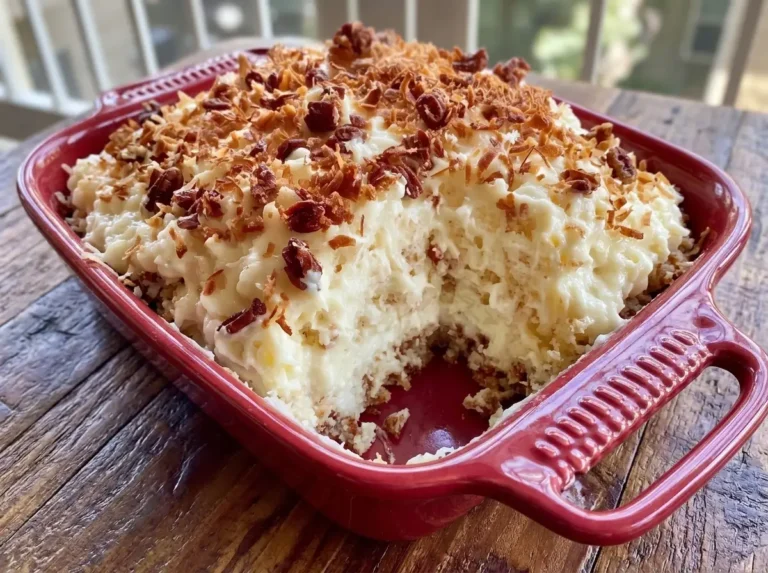
When you want a lush, tropical dessert that brings a wave of summer refreshment to any table, poke cakes and sundae-style cakes are unbeatable crowd-pleasers. Traditional southern coconut poked cakes often rely on sugary boxed mixes, canned condensed milks, and heavy artificial syrups that can lead to sudden blood sugar spikes. This Sugar-Free Coconut Cream Sundae Cake delivers all the rich, creamy, and decadent coconut comfort of a traditional bakery dessert while remaining completely sugar-free.
Featuring a moist, fluffy cake base infused with coconut extract, a rich coconut milk soak that seeps into every bite, and a light whipped topping crowned with toasted coconut flakes, this dessert is pure bliss. Best of all, it breaks down into simple, manageable steps that make prep stress-free for weekend potlucks, holiday dinners, or special family celebrations.
Table of Contents
Why You Will Love This Sugar-Free Sundae Cake
- Ultra-Moist Poke Cake Style: Poking holes throughout the warm cake allows a sweet coconut soak to saturate the crumb, creating an amazingly tender texture.
- 100% Sugar-Free Comfort: Sweetened naturally with zero-calorie granulated alternatives like allulose or monk fruit to keep carbohydrates low and satisfaction high.
- Nutty Toasted Coconut Crunch: Layered with lightly toasted shredded coconut and coconut chips on top for a wonderful textural contrast to the soft cake.
- Perfect Make-Ahead Dessert: Gets richer and more delicious as it sits in the refrigerator, making it ideal for prepping the day before a gathering.
Simple Ingredients for a Tropical Sundae Cake
This recipe uses clever convenience staples combined with low-sugar substitutes to build three delicious layers.
The Cake Base
- 1 box sugar-free white or yellow cake mix (or low-carb cake mix): Serves as the tender foundation for the poke cake.
- Ingredients required on the cake mix box: Typically eggs, oil/butter, and water/milk as specified on your chosen mix.
- 1 teaspoon coconut extract: Boosts the cake base with authentic tropical flavor.
The Coconut Soak
- 1 can (13.5–14 ounces) full-fat coconut milk (unsweetened): Provides a creamy, rich liquid base for the soak.
- 1/2 cup granulated sugar-free sweetener (allulose or monk fruit blend): Sweetens the soak smoothly without sugar.
- 1 teaspoon vanilla extract: Adds bakery warmth to the coconut mixture.
Topping & Garnish
- 1 container (8 oz) sugar-free whipped topping (or homemade whipped cream): Forms the fluffy, sundae-style frosting layer.
- 1 1/2 cups unsweetened shredded coconut (toasted): Adds a golden, nutty crunch over the top.
- 1/2 cup unsweetened coconut chips (toasted, optional): Provides extra crunch and an attractive garnish.
- Optional garnishes: Fresh raspberries, sugar-free white chocolate curls, or fresh lime zest.
Step-by-Step Instructions
Follow these three simple steps to bake, soak, and decorate your sugar-free coconut sundae cake.
Step 1: Bake and Poke
- Preheat your oven according to the instructions on your sugar-free cake mix box and grease a 9×13-inch baking dish.
- Prepare the cake batter as directed on the box, stirring in 1 teaspoon of coconut extract. Bake in the prepared dish according to package directions.
- Remove the cake from the oven and allow it to cool for about 10 minutes.
- Using the handle of a wooden spoon or a large drinking straw, poke holes evenly across the entire surface of the warm cake, spacing them about an inch apart.
Step 2: Soak and Chill
- In a medium mixing bowl, whisk together 1 can of unsweetened full-fat coconut milk, 1/2 cup of granulated sugar-free sweetener, and 1 teaspoon of vanilla extract until completely smooth and blended.
- Slowly pour the coconut mixture evenly over the warm poked cake, making sure it fills the holes and saturates the edges.
- Cover the baking dish and refrigerate for at least 2 hours to allow the cake to absorb the liquid.
Step 3: Decorate and Serve
- Remove the chilled, soaked cake from the refrigerator and spread 8 ounces of sugar-free whipped topping evenly across the surface using an offset spatula.
- Sprinkle generously with 1 1/2 cups of toasted unsweetened shredded coconut and 1/2 cup of toasted coconut chips. Add any desired optional garnishes, such as fresh raspberries or lime zest.
- Return the cake to the refrigerator for at least 1 more hour to let the layers set firmly before slicing into squares and serving chilled.
Pro Tips for Perfect Coconut Cake Results
- Toast Coconut Carefully: Toast your unsweetened shredded coconut and coconut chips in a dry skillet over medium-low heat for 3 to 5 minutes, stirring constantly until golden brown. Keep a close eye on them, as coconut can burn quickly!
- Poke While Warm: Be sure to poke holes and add the coconut soak while the cake is still warm. Warm cake crumbs absorb liquid much better than cold cake.
- Allow Adequate Chill Time: Give the cake the full chilling time in the refrigerator so the coconut milk soak can settle into the crumb completely without making the base soggy.
- Use Full-Fat Coconut Milk: Stick with full-fat canned coconut milk for the soak layer rather than light or carton coconut milk, as the natural coconut fats create a far richer custard-like taste.
Storage and Meal Prep Instructions
- Refrigeration: Keep leftover cake covered securely with foil or plastic wrap in the refrigerator for up to 4 days.
- Make-Ahead Friendly: This cake is an exceptional make-ahead choice for hosting, as the flavor and moisture levels improve after overnight refrigeration.
FAQs
Why do I need to poke holes in the cake?
Poking holes creates channels for the sweet coconut milk soak to travel deep into the center of the baked sponge, ensuring every single bite is extremely moist and full of coconut flavor.
Can I make homemade whipped cream for the topping?
Yes! You can easily whip 1 cup of cold heavy cream with 2 tablespoons of powdered sugar-free sweetener and a splash of vanilla extract until stiff peaks form, then spread it over the cake.
Can I use carton coconut milk instead of canned full-fat coconut milk?
Canned full-fat coconut milk is strongly recommended. Carton coconut milk is much thinner and contains more water, which can make the cake base watery rather than rich and creamy.
How do I store leftovers?
Store any remaining cake tightly covered in the refrigerator for up to 4 days. Because of the dairy and coconut milk content, it should always be kept chilled until serving.
Print
3-Step Easy Sugar-Free Coconut Cream Sundae Cake
- Total Time: Approximately 3 hours 55 minutes to 4 hours 55 minutes, including chilling time.
- Yield: 1 (9 × 13-inch) cake, cut into 12 squares 1x
Description
Enjoy a taste of the tropics with this easy Sugar-Free Coconut Cream Sundae Cake! Featuring a soft, fluffy coconut cake base, a rich and creamy coconut milk soak, and a light whipped topping finished with golden toasted coconut, this irresistible poke cake delivers bakery-style indulgence without added sugar. Made with a sugar-free cake mix and your favorite zero-sugar sweetener, it is perfect for summer gatherings, potlucks, holiday celebrations, or make-ahead family desserts. With just three simple preparation steps, this creamy coconut dessert is easy to make and even easier to love.
Ingredients
For the Cake Base
- 1 box (approximately 13–16 oz) sugar-free white or yellow cake mix
- Eggs, oil, and water or milk as required by the cake mix package
- 1 teaspoon coconut extract
For the Coconut Cream Soak
- 1 can (13.5–14 oz) unsweetened full-fat coconut milk
- 1/2 cup granulated sugar-free sweetener, such as allulose or a monk fruit blend
- 1 teaspoon vanilla extract
For the Topping
- 1 container (8 oz) sugar-free whipped topping, thawed, or homemade sugar-free whipped cream
- 1 1/2 cups unsweetened shredded coconut, toasted
- 1/2 cup unsweetened coconut chips, toasted (optional)
- Fresh raspberries, optional
- Sugar-free white chocolate curls, optional
- Fresh lime zest, optional
Instructions
Step 1: Bake and Poke the Cake
- Preheat the oven according to the cake mix package instructions. Grease a 9 × 13-inch baking dish.
- Prepare the cake batter according to the package directions, adding 1 teaspoon of coconut extract.
- Pour the batter into the prepared baking dish and bake according to the package instructions, or until a toothpick inserted into the center comes out clean.
- Remove the cake from the oven and let it cool for approximately 10 minutes.
- Using the handle of a wooden spoon or a large straw, poke holes evenly across the cake, spacing them about 1 inch apart.
Step 2: Add the Coconut Soak and Chill
- In a medium bowl, whisk together the unsweetened coconut milk, sugar-free sweetener, and vanilla extract until the sweetener is dissolved as much as possible.
- Slowly pour the coconut mixture evenly over the warm cake, allowing it to seep into the holes.
- Cover the baking dish and refrigerate for at least 2 hours to let the cake absorb the coconut cream mixture.
Step 3: Decorate and Serve
- Spread the sugar-free whipped topping evenly over the chilled cake.
- Sprinkle the toasted shredded coconut and optional toasted coconut chips over the topping.
- Add fresh raspberries, sugar-free white chocolate curls, or lime zest if desired.
- Refrigerate for at least 1 additional hour to allow the layers to set.
- Slice into squares and serve chilled.
Notes
- Toast the coconut carefully: Toast the shredded coconut and coconut chips in a dry skillet over medium-low heat for 3–5 minutes, stirring frequently until golden brown.
- Use canned coconut milk: Full-fat canned coconut milk provides the richest flavor and creamiest texture. Stir or whisk it well before measuring.
- Check your sweetener: Allulose and monk fruit blends vary in sweetness. Taste the coconut soak and adjust the amount to suit your preferred sweetness.
- Allow enough chilling time: The cake needs time to absorb the coconut mixture and set properly. Overnight refrigeration produces an especially moist, flavorful dessert.
- Make it dairy-free: Choose a dairy-free whipped topping and a cake mix that meets your dietary requirements.
- Storage: Cover and refrigerate leftovers for up to 4 days. Keep the cake chilled until serving.
- Homemade topping option: Whip 1 cup of cold heavy cream with approximately 2 tablespoons of powdered sugar-free sweetener and a splash of vanilla until stiff peaks form. For a dairy-free version, use a suitable coconut-based whipping cream.
- Prep Time: 20 minutes
- Cook Time: 25–35 minutes, depending on the cake mix
- Category: Dessert
- Cuisine: American
Nutrition
- Serving Size: 12 servings
- Calories: 300–380 kcal
- Fat: 20–27 g
- Carbohydrates: 20–35 g
- Fiber: 2–4 g
- Protein: 3–5 g