
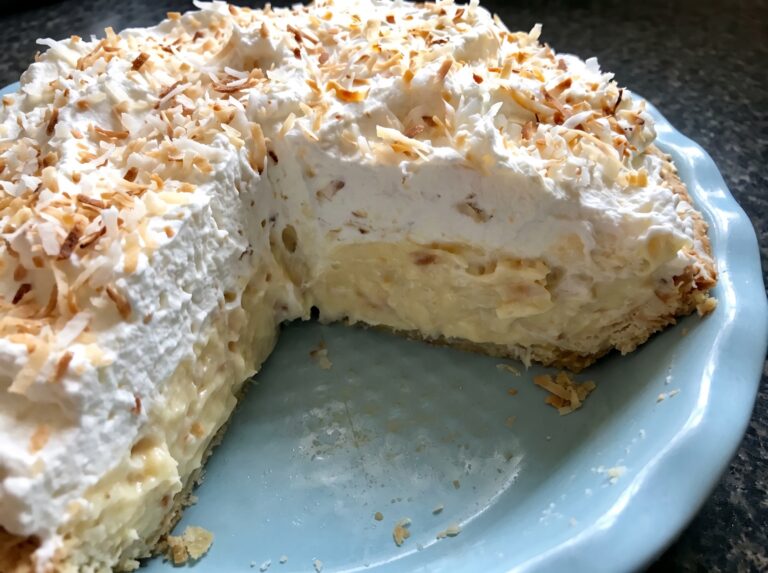
When it comes to traditional American pie classics, few desserts capture the cozy nostalgia of home baking like a rich, old-fashioned coconut cream pie. With its silky coconut custard filling, airy whipped cream topping, and delicate sprinkle of golden toasted coconut flakes, this beloved staple is a constant favorite at family dinners and holiday gatherings.
However, standard pie recipes often contain excessive amounts of refined white sugar, heavy corn syrups, and pre-sweetened coconut flakes that hide the genuine flavor of real coconut. This Sugar-Free Coconut Cream Pie eliminates added sugars while enhancing every creamy bite. Made with wholesome ingredients, rich dairy, and natural zero-sugar sweeteners, this recipe delivers maximum bakery-style comfort without compromising your health or lifestyle goals.
Table of Contents
Why You Will Love This Sugar-Free Coconut Pie
- Authentic Coconut Flavor: Infused with real unsweetened toasted coconut flakes and a subtle hint of pure coconut extract for deep, natural flavor in every slice.
- Silky Smooth Custard: Cooked on the stovetop with fresh egg yolks, milk, and cream to achieve a classic velvety texture that holds its shape beautifully.
- 100% Sugar-Free Comfort: Utilizing zero-calorie sweetener options like allulose or monk fruit ensures traditional sweetness without blood sugar spikes.
- Fluffy Homemade Topping: Finished with real cold-whipped heavy cream sweetened lightly with powdered sweetener instead of artificial whipped toppings.
Simple Ingredients for a Rich Stovetop Custard
This pie comes together in three seamless components: the toasted coconut infusion, the cooked custard base, and the fluffy whipped topping.
The Toasted Coconut Custard Filling
- 1 1/4 cups unsweetened coconut flakes (toasted, divided): Infuses the custard with nutty flavor while providing texture.
- 2 1/4 cups whole milk: Creates the rich, full-bodied liquid base for classic custard.
- 1 cup heavy cream: Adds silkiness and luxurious mouthfeel to the filling.
- 5 large egg yolks: Essential for binding, setting, and rich golden color.
- 3/4 cup granulated sugar-free sweetener (allulose or monk fruit): Dissolves cleanly to sweeten the custard naturally.
- 5 tablespoons cornstarch: Sets the warm custard firmly for easy slicing.
- 3/8 teaspoon salt: Balances sweetness and elevates the coconut flavor.
- 2 1/2 tablespoons unsalted butter: Whisked into the warm custard for a glossy finish.
- 1 1/4 teaspoons vanilla extract: Enhances the overall sweet flavor profile.
- 3 drops coconut extract: Boosts the coconut aroma without overwhelming the dish.
The Pie Base
- 1 pre-baked 9-inch pie shell: Use a low-carb, lower-sugar, or classic blind-baked pie shell of your choice.
The Fluffy Whipped Cream Topping
- 2 cups heavy whipping cream (cold): Whip while cold to achieve maximum stability and soft peaks.
- 2 tablespoons powdered sugar-free sweetener: Dissolves instantly into cold cream without grit.
- 1 teaspoon vanilla extract: Adds classic bakery-style aroma.
- 1/4 cup toasted unsweetened coconut flakes: Saved from the initial batch to garnish the finished pie.
Step-by-Step Instructions
Follow these five simple steps to bake, fill, chill, and serve your custard pie.
Step 1: Toast the Coconut Flakes
- Preheat your oven to 350°F (175°C).
- Line a baking sheet with parchment paper and spread 1 1/4 cups of unsweetened coconut flakes in a single, even layer.
- Toast in the oven for 4 to 6 minutes, stirring halfway through, until the flakes turn light golden brown. (Watch closely as coconut can burn quickly).
- Remove from the oven and let the toasted coconut cool completely at room temperature. Set aside 1/4 cup for the top garnish.
Step 2: Cook the Coconut Custard Filling
- In a medium saucepan, combine the whole milk, heavy cream, 1 cup of the cooled toasted coconut, egg yolks, granulated sugar-free sweetener, cornstarch, salt, and butter.
- Place over low heat and whisk constantly as the mixture warms and approaches a gentle simmer.
- Continue to cook, whisking non-stop, for about 2 minutes until the custard becomes thick, smooth, and starts to bubble.
- Remove the saucepan from the heat immediately. Stir in 1 1/4 teaspoons of vanilla extract and 3 drops of coconut extract until smooth.
Step 3: Fill the Pie Shell and Chill
- Pour the warm coconut custard directly into your pre-baked 9-inch pie shell.
- Use a rubber spatula to smooth the top surface into an even layer.
- Cover the pie loosely with plastic wrap directly touching the top of the custard to prevent a firm skin from forming.
- Transfer to the refrigerator and chill for at least 1 hour, or until the filling sets completely cold and firm.
Step 4: Whip the Fresh Cream Topping
- In a large chilled mixing bowl, combine 2 cups of cold heavy whipping cream, 2 tablespoons of powdered sugar-free sweetener, and 1 teaspoon of vanilla extract.
- Use an electric hand mixer or whisk to beat the cream on medium-high speed until fluffy, soft peaks form.
- Spread the whipped cream evenly over the top of the set coconut custard using an offset spatula.
- Sprinkle the reserved 1/4 cup of toasted coconut flakes evenly across the top.
Step 5: Slice and Serve
- Keep the completed pie chilled in the refrigerator until ready to slice.
- Slice into equal wedges using a sharp knife dipped in warm water between cuts.
- Garnish individual slices with extra toasted coconut if desired, and serve cold!
Pro Tips for Perfect Bakery-Style Custard Pies
- Whisk Constantly on Stovetop: Stovetop custards can scorch or form lumps if left unattended. Whisking continuously ensures a silky, lump-free texture.
- Keep an Eye on the Coconut: Unsweetened coconut flakes have natural oils that cause them to brown very fast. Remove them from the sheet pan as soon as they reach a light golden shade.
- Chill Completely Before Topping: Never apply fresh whipped cream over warm or room-temperature custard, or the cream will melt into liquid. Always ensure the pie filling is cold to the touch.
- Dip Knife for Clean Slices: To achieve clean, professional-looking pie slices, dip your knife blade in warm water and wipe it clean with a towel before making each cut.
Storage and Meal Prep Instructions
- Refrigeration: Cover the pie loosely with foil or a pie dome and keep it stored in the refrigerator for up to 3 days.
- Prep Ahead: You can bake your pie shell and cook the coconut custard 24 hours in advance. Keep the filled pie shell chilled, then whip and add the topping right before serving.
FAQs
Why is my coconut custard filling runny?
If the custard filling fails to set, it usually means the cornstarch mixture was not heated long enough on the stovetop to fully activate its thickening properties, or the pie was cut before it had enough time to chill completely in the refrigerator.
Can I use liquid sweeteners instead of granulated?
It is best to stick with granulated sugar substitutes (like allulose or monk fruit) for the custard filling. Liquid sweeteners alter the moisture ratio of the recipe and can prevent the cornstarch from setting the custard properly.
What is the best sweetener for the whipped cream topping?
Powdered or confectioner-style sugar-free sweeteners work best for whipped cream because they blend seamlessly into cold heavy cream without leaving a grainy texture behind.
Can I make this pie completely crustless?
Yes! You can easily make coconut custard pots by pouring the hot custard filling directly into small glass ramekins, chilling until firm, and topping each ramekin with whipped cream and toasted coconut flakes.
Print
5-Step Easy Sugar-Free Coconut Cream Pie Recipe
- Total Time: 35 minutes active preparation and cooking, plus at least 4 hours of chilling time
- Yield: 8 slices from one 9-inch pie 1x
Description
Enjoy a classic American dessert with this easy Sugar-Free Coconut Cream Pie! Featuring a silky homemade coconut custard, a buttery pie crust, fluffy whipped cream, and golden toasted coconut flakes, this delicious pie delivers traditional bakery-style flavor without added sugar. Made with unsweetened coconut, rich dairy, and a sugar-free sweetener, it is perfect for holidays, family gatherings, or whenever you crave a creamy coconut dessert. Choose a low-carb pie crust and a suitable zero-sugar sweetener to fit your dietary preferences.
Ingredients
For the Coconut Custard Filling
- 1 1/4 cups unsweetened coconut flakes, toasted and divided
- 2 1/4 cups whole milk
- 1 cup heavy cream
- 5 large egg yolks
- 3/4 cup granulated sugar-free sweetener, such as allulose or a suitable monk fruit blend
- 5 tablespoons cornstarch
- 3/8 teaspoon salt
- 2 1/2 tablespoons unsalted butter
- 1 1/4 teaspoons vanilla extract
- 3 drops coconut extract
For the Pie Crust
- 1 pre-baked 9-inch pie shell, regular or low-carb
For the Whipped Cream Topping
- 2 cups cold heavy whipping cream
- 2 tablespoons powdered sugar-free sweetener
- 1 teaspoon vanilla extract
- 1/4 cup reserved toasted unsweetened coconut flakes
Instructions
- Toast the Coconut: Preheat the oven to 350°F (175°C). Spread the unsweetened coconut flakes in a single layer on a parchment-lined baking sheet. Bake for 4–6 minutes, stirring halfway through, until lightly golden. Watch carefully to prevent burning. Cool completely and reserve 1/4 cup for garnish.
- Prepare the Coconut Custard: In a medium saucepan, whisk together the milk, heavy cream, egg yolks, granulated sugar-free sweetener, cornstarch, salt, butter, and 1 cup of toasted coconut. Cook over medium-low heat, whisking constantly, until the mixture thickens and begins to bubble. Continue cooking briefly according to the cornstarch package guidance to ensure the custard sets properly. Remove from the heat and stir in the vanilla and coconut extracts until smooth.
- Fill and Chill the Pie: Pour the warm custard into the pre-baked 9-inch pie shell. Smooth the surface with a spatula. Press plastic wrap directly against the custard to prevent a skin from forming. Refrigerate until completely cold and firm, allowing at least 4 hours for the best results.
- Make the Whipped Cream Topping: In a chilled mixing bowl, beat the cold heavy whipping cream, powdered sugar-free sweetener, and vanilla extract until soft to medium peaks form. Spread the whipped cream evenly over the chilled custard. Sprinkle the reserved toasted coconut flakes over the top.
- Slice and Serve: Keep the pie refrigerated until serving. For neat slices, dip a sharp knife in warm water and wipe it clean between cuts. Slice into wedges and serve chilled, adding extra toasted coconut if desired.
Notes
- Prevent a runny filling: Whisk constantly and ensure the custard reaches a proper bubbling simmer so the cornstarch activates. Allow sufficient refrigeration time before slicing.
- Choose your sweetener carefully: Use a granulated sweetener suitable for cooking and a powdered version for the topping. Sweetness varies between brands, so follow the manufacturer’s conversion guidance.
- Get clean slices: Chill the pie thoroughly before cutting, and clean the knife between slices.
- Make ahead: Prepare the crust and custard up to one day in advance. Add the whipped cream topping shortly before serving for the freshest texture.
- Storage: Cover and refrigerate leftovers for up to 3 days. Do not leave the dairy- and egg-based pie at room temperature for more than 2 hours.
- Crustless option: Divide the cooked custard among individual ramekins, chill until set, and finish with whipped cream and toasted coconut.
- Dietary note: For a lower-carb variation, use a suitable low-carb crust and check the sweetener label. Cornstarch and regular milk still contribute carbohydrates, so this recipe is not automatically keto-friendly.
- Prep Time: 20 minutes
- Cook Time: 15 minutes
- Category: Dessert
- Cuisine: American
Nutrition
- Serving Size: 1 slice
- Calories: 480
- Fat: 40 g
- Carbohydrates: 24 g
- Fiber: 2 g
- Protein: 6 g